=
note the photos here are protected by copyright rules
DOWNLOADS
The downloadds contain the whole project plus the Exe in the debug folder
To start rect motion presss left mouse button and stop it press right mouse button click
and start again using the left mouse the time was chosen is 300 milli seconds
To start the tutorial
1- Start new single document application and let us name it TimeEX and deselect printing and print proview
2- In your derived view class add the following public data member m_rect_time ;
3- In your view class initilise it as follows :m_rect_time( 20,20,50,50) .
4- Add windows messege handlers for WM_TIMER , WM_RBUTTONDOWN, WM_LBUTTOMDOWN .
5- Edit the OnTimer function as shown in red
// timer action
void CTimerEXView::OnTimer(UINT nIDEvent) {
if(m_rect_time.right> 250 ) m_rect_time.OffsetRect( -250,0) ;
// rectangle motion
m_rect_time.OffsetRect( 50,0) ;
InvalidateRect(NULL,TRUE);
CView::OnTimer(nIDEvent);
}
6-Edit on left button handler as shown here in red
SetTimer(1, 300,NULL) ; // 3 00 millisecond
// trigger the timer by setting the time 3 00 millisecond 1 mearns first timer NULL timers window
7- Edit the on right buttom down as folows
KillTimer(1);
// we have only one timer
8-Edit the ondRaw as follows
pDC->TextOut(70 ,70,"Press the left mouse button to start moving the rectangle using timer and right button to stop it") ;
pDC->SelectStockObject(BLACK_BRUSH );
pDC->Rectangle(m_rect_time) ;
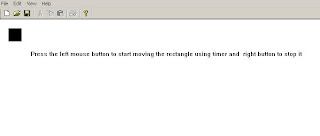
9- Build the application and start stoping the rectangle as what I did here is the figure below

of course you can use bigger font for the text and can change tiime interval by change the value in settimer second paprameter
Press CTrl F5 abd build it
to download the whole project click here
I hope that I guided how to create simple timer tutorial
Hints To practice
if you want multiple timers then is what you have to do is to trigger multiple timer by the function settimer by changing the first and second parameter
for example if you have second timer SetTimer( 2,400, NULL)
second one is set to 400 and add handler to killtimer by killTimer(2) ;
and so on also try different values in the second parameters in settimer ( ) and see the effects
Use callBack functions instead of the WM_TIMER you used and try to control the clock by increasing and decreasing time intervals using menus
for lessons ans extra tutorials see the rest of the blog
for notes and and comments leave me a post below
Creating Dual Timers
1 Create buttons in the toolbar as shown in the figure below

Make like them
Then assign the following ids for the buttons
IDC_GO_LEFT , IDC_BAN_HORIZONTAL_MOVES ,IDC_ACTIVATE_VERTICAL_MOVES AND IDC_FREESE_UPDOWN
2- In the view class add the following member variables
BOOL m_b_halt_leftright,m_Bol_suspended_UpDown_motion
;
CRect m_animated_sqaure ;
Make them public
The Boolean variables are used to enable moving and the square is the animated object
3-Go to the constructor of the class and edit it as follows
CDualtimersView::CDualtimersView():m_animated_sqaure(20,20,50,50)
{
m_b_halt_leftright = TRUE ;
m_Bol_suspended_UpDown_motion = TRUE ;
}
// so at first the square is stopped
Now go on Draw virtual function and edit as follows
void CDualtimersView::OnDraw(CDC* pDC)
{
pDC->TextOut(40,10," Press Toolbars bottons");
pDC->SelectStockObject(BLACK_BRUSH );
pDC->Rectangle(m_animated_sqaure) ;
}
// The ondraw vertual function with dimentions 30 pixels by 30 pixels draw black square
Add windows message handler for the WM_timer and edit as
void CDualtimersView::OnTimer(UINT IDEvent)
{
switch(IDEvent)
{
case 1:
// first timer
if(m_animated_sqaure.right> 250 )
m_animated_sqaure.OffsetRect( -250,0) ;
m_animated_sqaure.OffsetRect( 20,0) ;
InvalidateRect(NULL,TRUE);
break ;
case 2:
// second timer and the action to shift
if(m_animated_sqaure.top <10)
m_animated_sqaure.OffsetRect(0,200);
m_animated_sqaure.OffsetRect( 0,-10) ;
InvalidateRect(NULL,TRUE);
break;
default:
CView::OnTimer(IDEvent);
}
}
Now add windows mesege handler for the Tolbar buttons
We start with the first button
void CDualtimersView::OnGoLeft()
{
// see if the button not pressed
if(m_b_halt_leftright) {
SetTimer( 1,500,NULL) ;
// half a second
m_b_halt_leftright =FALSE ;
}
}
and add Update windows messge handler for the same button
void CDualtimersView::OnUpdateGoLeft(CCmdUI* pCmdUI)
{
pCmdUI->Enable(m_b_halt_leftright);
}
Do the same for the whole buttons as you can see here
void CDualtimersView::OnBanHorizontalMoves()
{
if(!m_b_halt_leftright) {
KillTimer(1);
m_b_halt_leftright =TRUE ;
}
}
void CDualtimersView::OnUpdateBanHorizontalMoves(CCmdUI* pCmdUI)
{
pCmdUI->Enable(!m_b_halt_leftright);
}
void CDualtimersView::OnActivateVerticalStep()
{
if(m_Bol_suspended_UpDown_motion) {
SetTimer( 2,200,NULL) ;
m_Bol_suspended_UpDown_motion =FALSE ;
}
}
void CDualtimersView::OnUpdateActivateVerticalStep(CCmdUI* pCmdUI)
{
pCmdUI->Enable(m_Bol_suspended_UpDown_motion);
}
void CDualtimersView::OnFreezeUpdown()
{
if(!m_Bol_suspended_UpDown_motion) {
KillTimer(2);
m_Bol_suspended_UpDown_motion =TRUE ;
}
}
void CDualtimersView::OnUpdateFreezeUpdown(CCmdUI* pCmdUI)
{
pCmdUI->Enable(!m_Bol_suspended_UpDown_motion);
}
As an activity Add discription to the code i did
Note use better method for naming
and also see the toolbar example for more on toolbars and use menu items to start and stop the motion and add keyboard accelerators
Click here to download both examples Download link
Please leave your feedback below

 and assign the following IDs to them
  and after moving it for some bushes on the button you will get similar to this and try to move near the corners to see what happens there


