Showing posts with label example. Show all posts

5/25/09

setw example

In this vc++ set example

start new cpp file and name it fano

copy the code below and see the output

#include
#include
using namespace std;

int main () {

int Numa = 1234567890 ;

int NumB = 5432 ;int NumC =2324234 ;
cout << "Numa = " <<><
<< numb ="\n"><<< endl ;
cout<< " NumC\n " <<<
return 0;
}


set different value in the function and see the outcome

This is compiled using VC++ 6 compiler

try different ones

5/21/09

c++ dll example

In this c++ dll example we used a dlll to perform simple mathematical operation which is to convert from Celsius to Fahrenheit and vice versa


The first step is creating the dll
1 - Start new Win32 Dynamic link library and name it famo chose simple dll project the middle one
2- Open the code and add the following
__declspec(dllexport)void Fehrenhite_Celcius_converter(int n_operation, double input , double &result) ;
// we used reference here since we want to change the value of output inside the function
below #include "stdafx.h"

and at the buttom
add the following

void Fehrenhite_Celcius_converter(int n_operation, double input , double &result)
{
switch (n_operation) {
case 0 :
result= 1.8 * input +32 ;
break ;
case 1 :
result = ( ( double) 5/ (double) 9) * (input -32) ;

break ;
}
// casting needed here bec 5/9 is considered 0
break ; }
}

compile the dlll

Now start new MFC name it mydll_program dialog application and chose not to select the about box and name iy Celcius_Fehrenhite converter

3- Add the 2 static controls and 2 Edit controls a button , group box and 2 radio buttons as shown above

In the group box name it converting and in the static boxes in the properties chose caption input and for the second one chose caption output

Add member variables in the class wizards m_input for the first edit box and m_outputs for the second edit box both of type CString
Add a variable of type int integer for the first radio button m_operation
in the properties chose group

4- after compiling the dlls copy the lib and dll to dialog directory

5- In the project menu Add to projects then chose files as shown here


In the class wizard add member function for the calculate button and name it On_Conversion or anything

Add the following line at the top of the dialog class
__declspec(dllimport)void Fehrenhite_Celcius_converter(int n_operation, double input , double &result) ;
To include the dlls

put in the On_Conversion add follows


void CMydll_programDlg::On_Conversion()
{
UpdateData();
double inputs , outputs ;
inputs = atof(m_input);
// temperature input
Fehrenhite_Celcius_converter(m_operation , inputs ,outputs) ;
// m_operation represents the type of conversion
m_outputs.Format("%2.3f", outputs);
UpdateData(FALSE);
}

build and compile your program

This lesson teaches you how to make simple static dll application for more see other links in the blog

3/21/09

visual C++ Crect InflateRect Example


In this visual c++ CRect InflateRect example We build simple application that enlarge a rectangle and changing color
To initiate the move you press inside the small rectangle to get irregular enlargement or out side the rectangle to get regular inflation and multiple colors

To the Executable file click here InflatidREct_exe and the complete project theproject

Start Building the project

1- Start new MFC exe single document and name it like inflated_rect
2 - Add the following data members to your derived View class
public:
CRect m_rect_red ,m_rect_blue ;
CBrush m_bar_red ,m_br_green ,m_brush_blue ,m_br_orange ;


and initiliza them in Cview constructor as follows

CInflated_rectangleView::CInflated_rectangleView(): m_rect_red(40,40,120,400),m_rect_blue(70,210,90,230),m_bar_red(RGB(99,0,0)),m_br_green(RGB(0,99,0)),m_brush_blue(RGB(0,0,99)),m_br_orange(RGB(0xCC,0x99,33))
{

}


3- Add the following messege handlers to your derived View class WM_RBUTTONDOWN ,WM_LBUTTONDOWN ,WM_TIMER

and edit the functions they generate as follows

void CInflated_rectangleView::OnLButtonDown(UINT nFlags, CPoint point)
{

if(m_rect_blue.PtInRect(point)){
m_rect_blue.InflateRect(2,5,1,12) ; // irregular inflation
InvalidateRect(NULL,FALSE);
}
else
SetTimer(1, 300,NULL) ; CView::OnLButtonDown(nFlags, point);
}


void CInflated_rectangleView::OnRButtonDown(UINT nFlags, CPoint point)
{
KillTimer(1);
CView::OnRButtonDown(nFlags, point);
}


and finaly

void CInflated_rectangleView::OnTimer(UINT nIDEvent)
{
if( m_rect_blue.left>50)
m_rect_blue.InflateRect(4,1) ;
else
m_rect_blue.InflateRect(0,5);


if(m_rect_blue.top<>
m_rect_blue.SetRect(70,210,90,230); // return to first siza

InvalidateRect(NULL,TRUE);
}


4-

Finally edit t the ondraw function to as follows \

void CInflated_rectangleView::OnDraw(CDC* pDC)
{

pDC->TextOut(40,15," Press the left key to see the effect amd try to press inside the blue");

pDC->SelectObject( m_bar_red) ;
pDC->Rectangle( m_rect_red);
pDC->SelectObject(m_brush_blue) ;
if(m_rect_blue.left<=45)
pDC->SelectObject ( m_br_green);
if(m_rect_blue.top <=120)
pDC->SelectObject( m_br_orange);

pDC->Rectangle( m_rect_blue) ;


}


and then build the applications and enjoy it

3/18/09

Visual c++ IntersectRect example tutorial


In this visual c++ IntersectRect Example we will learn how to use the mfc intersection function


The intersected rectangle hatched in Red

to get the exefile click here and download the file and get the complete project and thinks of additions you can make


To start


1- Start a new project and let us name it IntersectRectangle

2- chose single document and deselect printing and print view no need for them

3- Add the following members to the view class

public:

BOOL m_b_IsIntersected; // weather there is intersection or not

CRect m_Gray_Rectangle , m_Moving_Rectangle ,m_RectIntersection ;

// constant REct and moving and the rectangle of intersection

make your data members public to avoid using getters and setters

4-Initilize the values of the two rectangles in the constructor as follows


CIntersectrectangleView::CIntersectrectangleView():m_Moving_Rectangle(100,60,160,120),m_Gray_Rectangle(90,80,120,110),m_b_IsIntersected(FALSE)

5-

Add the following messege handler to the derived view class


WM_TIMER ,WM_LBUTONDOWN, WM_RBUTTONDOWN

and edit them as follows

start with Wm timer


void CIntersectrectangleView::OnTimer(UINT nIDEvent) {

if(m_Moving_Rectangle.right> 300) m_Moving_Rectangle.OffsetRect(-280,0) ;

m_Moving_Rectangle.OffsetRect(20,0);InvalidateRect(NULL,TRUE); CView::OnTimer(nIDEvent);}


and

void CIntersectrectangleView::OnRButtonDown(UINT nFlags, CPoint point) { KillTimer(1);


CView::OnRButtonDown(nFlags, point);}


and


void CIntersectrectangleView::OnLButtonDown(UINT nFlags, CPoint point) {

SetTimer(1, 450,NULL) ;

CView::OnLButtonDown(nFlags, point);

}


6-


edit the ondraw member functions as follows


void CIntersectrectangleView::OnDraw(CDC* pDC){


pDC->TextOut(60,13,"Press the right button to start moving the black rectangle and the right to stop it and notice the intersection");

pDC->SelectStockObject(BLACK_BRUSH);

pDC->Rectangle(m_Moving_Rectangle);

pDC->SelectStockObject(LTGRAY_BRUSH);

pDC->Rectangle(m_Gray_Rectangle);

LPRECT lp_move = m_Moving_Rectangle.operator LPRECT() ;

// cast the moving rect to LPRECT

LPRECT lp_gray = m_Gray_Rectangle.operator LPRECT() ;

// and so as to the grayrect


m_b_IsIntersected = m_RectIntersection.IntersectRect( lp_move ,lp_gray);
// find whethere there is intersection and draw the intersection rect with hatchbrush
if( m_b_IsIntersected){


CBrush brushHatch(HS_DIAGCROSS, RGB(255, 90, 0));

pDC->SelectObject(brushHatch) ;

pDC->Rectangle(m_RectIntersection);
//I used getstockobject because it is easier to use

}

8- finally build the application and see how it works


Do not forget to use casting when using intersictRect it only accept arguments of type LPRECT

for more example see the rest of the blog


I hope that you enjoyed this tutorial


}


2/3/09

CFormView Example


In this Visual c++ CformView Example we used a class derived instead of CDialog
This applications contains 2 buttons one for devision and one for multiplication and it has 2 Edit controls to hold the 2 number involved in the arithmetic operation

After pressing the devision button here what you get

To create the application
1-Start a new MFC application wizard chose a name for the project let us CFORMVIEWEX or any thing u like
2-In the last step chose CFormView as the parent of your derived view class

3-Start building the dialog as shown above chose IDC_EDIT1 ,IDC_EDIT2 For the numbers on the lefts ,IDC_RESULT FOr the result number IDC_MULTIPLY FOR multiplication button finally chose IDC_DEVIDE for the devision

4-In class wizard the following member variables m_number1 for the first edit control NUM1 ;
m_number2 for the second edit control second number and finally for the result m_results do not forget to chose CString type for all of the variables
5- Add messege handler for the 2 buttons and name them Mulitiplication and Devide Respectively and edit the code of those functions

Here what you get the code is marked in Red

void CCFormViewExView::Mulitiplication()
{


double first_number , second_number , result;

UpdateData();// Read data

first_number = atof( m_number1) ;
second_number = atof( m_number2);

result = first_number * second_number ;

m_results.Format("%.3f", result) ;
UpdateData(FALSE); // WriteData

}

and the second function

as follows

void CCFormViewExView::Devide()
{


double NumA ,NumB , results ;

UpdateData();
NumA = atoi( m_number1);
NumB = atoi(m_number2);
results = NumA/NumB ;
m_results.Format("%.5f", results) ;
UpdateData(FALSE);
}

6- Finaly build the application stard putting numbers on the edit control and see the results
note the effect of using different parameters in Format function where Devision has 5 decimal numbers than Multiplication which has only 3

To download the whole project click here fullproject and if you want the exe file click here Exefile

This post contains many typos like devide and others i made them for search engines intentionaly Loll

1/28/09

Microsoft Visual c++ Timer Example

In This Tutorial microsoft visual c++ Timer example we use left mouse buttons to trigger the motion of a rectangle and kill the motion of a rectangle m_rect_time when left button up
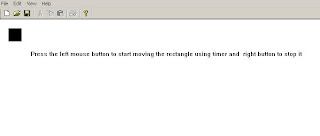


=

note the photos here are protected by copyright rules


DOWNLOADS

The downloadds contain the whole project plus the Exe in the debug folder
To start rect motion presss left mouse button and stop it press right mouse button click


and start again using the left mouse the time was chosen is 300 milli seconds


To start the tutorial


1- Start new single document application and let us name it TimeEX and deselect printing and print proview


2- In your derived view class add the following public data member m_rect_time ;

3- In your view class initilise it as follows :m_rect_time( 20,20,50,50) .

4- Add windows messege handlers for WM_TIMER , WM_RBUTTONDOWN, WM_LBUTTOMDOWN .

5- Edit the OnTimer function as shown in red
// timer action


void CTimerEXView::OnTimer(UINT nIDEvent) {

if(m_rect_time.right> 250 ) m_rect_time.OffsetRect( -250,0) ;


// rectangle motion


m_rect_time.OffsetRect( 50,0) ;

InvalidateRect(NULL,TRUE);


CView::OnTimer(nIDEvent);


}


6-Edit on left button handler as shown here in red

SetTimer(1, 300,NULL) ; // 3 00 millisecond

// trigger the timer by setting the time
3 00 millisecond 1 mearns first timer NULL timers window


7- Edit the on right buttom down as folows


KillTimer(1);

// we have only one timer


8-Edit the ondRaw as follows


pDC->TextOut(70 ,70,"Press the left mouse button to start moving the rectangle using timer and right button to stop it") ;

pDC->SelectStockObject(BLACK_BRUSH );

pDC->Rectangle(m_rect_time) ;


9- Build the application and start stoping the rectangle as what I did here is the figure below


of course you can use bigger font for the text and can change tiime interval by change the value in settimer second paprameter

Press CTrl F5 abd build it


to download the whole project click here
I hope that I guided how to create simple timer tutorial

Hints To practice
if you want multiple timers then is what you have to do is to trigger multiple timer by the function settimer by changing the first and second parameter
for example if you have second timer SetTimer( 2,400, NULL)
second one is set to 400 and add handler to killtimer by killTimer(2) ;
and so on also try different values in the second parameters in settimer ( ) and see the effects


Use callBack functions instead of the WM_TIMER you used and try to control the clock by increasing and decreasing time intervals using menus
for lessons ans extra tutorials see the rest of the blog

for notes and and comments leave me a post below

Creating Dual Timers

1 Create buttons in the toolbar as shown in the figure below


Make like them
Then assign the following ids for the buttons

IDC_GO_LEFT , IDC_BAN_HORIZONTAL_MOVES ,IDC_ACTIVATE_VERTICAL_MOVES AND IDC_FREESE_UPDOWN

2- In the view class add the following member variables
BOOL m_b_halt_leftright,m_Bol_suspended_UpDown_motion
;
CRect m_animated_sqaure ;

Make them public
The Boolean variables are used to enable moving and the square is the animated object

3-Go to the constructor of the class and edit it as follows

CDualtimersView::CDualtimersView():m_animated_sqaure(20,20,50,50)
{

m_b_halt_leftright = TRUE ;

m_Bol_suspended_UpDown_motion = TRUE ;


}

// so at first the square is stopped

Now go on Draw virtual function and edit as follows

void CDualtimersView::OnDraw(CDC* pDC)
{
pDC->TextOut(40,10," Press Toolbars bottons");

pDC->SelectStockObject(BLACK_BRUSH );
pDC->Rectangle(m_animated_sqaure) ;


}

// The ondraw vertual function with dimentions 30 pixels by 30 pixels draw black square

Add windows message handler for the WM_timer and edit as

void CDualtimersView::OnTimer(UINT IDEvent)
{


switch(IDEvent)
{

case 1:

// first timer

if(m_animated_sqaure.right> 250 )
m_animated_sqaure.OffsetRect( -250,0) ;
m_animated_sqaure.OffsetRect( 20,0) ;
InvalidateRect(NULL,TRUE);


break ;
case 2:
// second timer and the action to shift
if(m_animated_sqaure.top <10)
m_animated_sqaure.OffsetRect(0,200);
m_animated_sqaure.OffsetRect( 0,-10) ;
InvalidateRect(NULL,TRUE);
break;
default:


CView::OnTimer(IDEvent);
}


}


Now add windows mesege handler for the Tolbar buttons

We start with the first button

void CDualtimersView::OnGoLeft()
{
// see if the button not pressed
if(m_b_halt_leftright) {

SetTimer( 1,500,NULL) ;
// half a second
m_b_halt_leftright =FALSE ;
}
}

and add Update windows messge handler for the same button
void CDualtimersView::OnUpdateGoLeft(CCmdUI* pCmdUI)
{
pCmdUI->Enable(m_b_halt_leftright);


}

Do the same for the whole buttons as you can see here


void CDualtimersView::OnBanHorizontalMoves()
{
if(!m_b_halt_leftright) {
KillTimer(1);
m_b_halt_leftright =TRUE ;
}

}

void CDualtimersView::OnUpdateBanHorizontalMoves(CCmdUI* pCmdUI)
{
pCmdUI->Enable(!m_b_halt_leftright);


}

void CDualtimersView::OnActivateVerticalStep()
{
if(m_Bol_suspended_UpDown_motion) {
SetTimer( 2,200,NULL) ;
m_Bol_suspended_UpDown_motion =FALSE ;
}


}

void CDualtimersView::OnUpdateActivateVerticalStep(CCmdUI* pCmdUI)
{

pCmdUI->Enable(m_Bol_suspended_UpDown_motion);


}

void CDualtimersView::OnFreezeUpdown()
{


if(!m_Bol_suspended_UpDown_motion) {
KillTimer(2);
m_Bol_suspended_UpDown_motion =TRUE ;
}


}

void CDualtimersView::OnUpdateFreezeUpdown(CCmdUI* pCmdUI)
{
pCmdUI->Enable(!m_Bol_suspended_UpDown_motion);


}

As an activity Add discription to the code i did
Note use better method for naming
and also see the toolbar example for more on toolbars and use menu items to start and stop the motion and add keyboard accelerators


Click here to download both examples Download link

Please leave your feedback below

1/26/09

Microsoft visual c++ toolbar example

Microsoft visual c++ toolbar example use toolbar buttons to move movable rectangle m_rect_movable in four directions up, down , left and right and when intersected with a fixed rectangle m_rect_fixed it draws new rectangle with red - hatched pattern and also it the movable rectangle become blue hatched when it approaches the border rectangle m_rectBorder .
This program is similar to a previous program that used menu items to control the position of a movable rectangle
There is 2 things to check the first one is to check the intersection between the movable rectangle and the fixed rectangle so that draw a hatched pattern in the intersection rectangle I could not use IntersectRect function because it takes LPCRECT as parameters and the other thing to check was if the movable rectangle is close to the border rectangle ,you can GetClientRect function to get the window's client area instead of the border rectangle

To build the application

1- Chose new and build single doc application and name it like TOOLBAR_MOVE_EX
2- In the resource view go to toolbar and delete some of the default buttoms and add 4 buttoms as shown in the fig below and assign the following IDs to them ID_SHIFT_LEFT ,ID_SHIFT_RIGHT ,ID_MOVE_UP and ID_MOVE_DOWN sorry for the unpretty buttoms !!

3-Add the following data members to your derived CView class ( 3 rectangles and 5 boolean variables)
CRect m_rectBorder , m_rect_movable, m_rect_fixed ; // border ,movable and fixed rectangles respectively
BOOL m_bLeftBorder ,m_bRightBorder,m_bTopBorder ,m_bButtomBorder ,m_bIntersect;
// border and intersection indicators
4- In the view class initilize your data members as follows
CTOOLBAR_MOVE_EXView::CTOOLBAR_MOVE_EXView():m_rectBorder(10 ,10,340,340),m_rect_fixed(100,100,200,200) ,m_rect_movable(40,30,90,130)
{

m_bLeftBorder =m_bRightBorder =m_bTopBorder =m_bButtomBorder =m_bIntersect==FALSE ;


}


5- In your view add windows messege handlers for command and update command as follows


void CTOOLBAR_MOVE_EXView::OnShiftLeft()
{

if(m_rect_movable.left <=(m_rectBorder.left +40)) m_bLeftBorder = TRUE ; m_rect_movable.OffsetRect(-10,0); m_bRightBorder = FALSE ; if (m_rect_fixed.PtInRect(m_rect_movable.TopLeft()) | m_rect_fixed.PtInRect(m_rect_movable.BottomRight())| m_rect_fixed.PtInRect(CPoint(m_rect_movable.right,m_rect_movable.top))|m_rect_fixed.PtInRect(CPoint( m_rect_movable.left,m_rect_movable.bottom))) { m_bIntersect =TRUE ; } InvalidateRect(NULL,TRUE); } void CTOOLBAR_MOVE_EXView::OnUpdateShiftLeft(CCmdUI* pCmdUI) { pCmdUI->Enable(!m_bLeftBorder);


}

void CTOOLBAR_MOVE_EXView::OnShiftRight()
{


if(m_rect_movable.right >= ( m_rectBorder.right -30 ))
m_bRightBorder = TRUE ;

m_rect_movable.OffsetRect(10,0);
m_bLeftBorder = FALSE ;

if (m_rect_fixed.PtInRect(m_rect_movable.TopLeft()) | m_rect_fixed.PtInRect(m_rect_movable.BottomRight())| m_rect_fixed.PtInRect(CPoint(m_rect_movable.right,m_rect_movable.top))|m_rect_fixed.PtInRect(CPoint( m_rect_movable.left,m_rect_movable.bottom))) {
m_bIntersect =TRUE ;

}


InvalidateRect(NULL,TRUE);


}

void CTOOLBAR_MOVE_EXView::OnUpdateShiftRight(CCmdUI* pCmdUI)
{


pCmdUI->Enable(!m_bRightBorder);

}

void CTOOLBAR_MOVE_EXView::OnMoveDown()
{

if( m_rect_movable.bottom >= ( m_rectBorder.bottom -20))
m_bButtomBorder = TRUE ;


m_rect_movable.OffsetRect(0,10) ;
m_bTopBorder = FALSE ;

if (m_rect_fixed.PtInRect(m_rect_movable.TopLeft()) | m_rect_fixed.PtInRect(m_rect_movable.BottomRight())| m_rect_fixed.PtInRect(CPoint(m_rect_movable.right,m_rect_movable.top))|m_rect_fixed.PtInRect(CPoint( m_rect_movable.left,m_rect_movable.bottom))) {
m_bIntersect =TRUE ;

}


InvalidateRect(NULL,TRUE);


}

void CTOOLBAR_MOVE_EXView::OnUpdateMoveDown(CCmdUI* pCmdUI)
{


pCmdUI->Enable(!m_bButtomBorder);


}


void CTOOLBAR_MOVE_EXView::OnMoveUp()
{

if(m_rect_movable.top <= (m_rectBorder.top + 20)) m_bTopBorder =TRUE ; m_rect_movable.OffsetRect(0,-10) ; m_bButtomBorder = FALSE ; if (m_rect_fixed.PtInRect(m_rect_movable.TopLeft()) | m_rect_fixed.PtInRect(m_rect_movable.BottomRight())| m_rect_fixed.PtInRect(CPoint(m_rect_movable.right,m_rect_movable.top))|m_rect_fixed.PtInRect(CPoint( m_rect_movable.left,m_rect_movable.bottom))) { m_bIntersect =TRUE ; } InvalidateRect(NULL,TRUE); } void CTOOLBAR_MOVE_EXView::OnUpdateMoveUp(CCmdUI* pCmdUI) { pCmdUI->Enable(!m_bTopBorder);


}


6- Edit the OnDraw member function of your generated view

pDC->Rectangle(m_rectBorder) ; // white hallow
pDC->SelectStockObject(LTGRAY_BRUSH); // outer rectangle
pDC->Rectangle(m_rect_fixed); // fixed rectangle

CBrush bluebrush(HS_DIAGCROSS, RGB(0, 0, 250)); // blue brush for border condition when moveable rect on border

pDC->SelectStockObject(BLACK_BRUSH);
if(m_bLeftBorder |m_bRightBorder |m_bTopBorder |m_bButtomBorder)
pDC->SelectObject(bluebrush) ; // if in nearby the border rectangle
pDC->Rectangle(m_rect_movable);
if(m_bIntersect) {
CRect rc_intersection ;// use red hatch pattern
rc_intersection.IntersectRect(m_rect_movable ,m_rect_fixed);
CBrush brushHatch(HS_DIAGCROSS, RGB(255, 90, 0));
pDC->SelectObject(brushHatch) ;
pDC->Rectangle(rc_intersection);


}
7- try to move the movable rectangle around when you start the application you will start with a window like this
and after moving it for some bushes on the button you will get similar to this and try to move near the corners to see what happens there


to dowbload the whole project clich the link here

and the exe file

and do not forget to add accelerator use GetClientRect instead of the border Rect

1/18/09

C++ overloaded function example

C++ overloaded function example in this tuturial we used the c++ property of overloading to use single function for different purposes square rout , addition , multiplication and devision in one single operation

we include cmath library in order to use math functions

The code below marked in red demonstrate how made this sample program


#include
#include
using namespace std ;
double SQUAREROOT_MULTIPLY_SUM_DEVISION( double a){
return sqrt( a);}
double SQUAREROOT_MULTIPLY_SUM_DEVISION( double a , double b){
return a *b ;}
double SQUAREROOT_MULTIPLY_SUM_DEVISION (double a ,double b, double c){
return a + b + c ;}
double SQUAREROOT_MULTIPLY_SUM_DEVISION( double a ,double b, double c , double d){

return a /( b +c +d) ; }
C++ overloaded function example In this tutorial we used the property of overloading to use single function for 4 different purposes Square rout addition multiplication and division


int main (){


cout << " this program used single function to perform square rout , multiplication , addition and devisition in single operation " <<>

double w = SQUAREROOT_MULTIPLY_SUM_DEVISION(4);
cout<< " square root of 4 ="<<>
double x = SQUAREROOT_MULTIPLY_SUM_DEVISION( 12 ,14);
cout << " the sum of 13 and 14 is "<<>
double y = SQUAREROOT_MULTIPLY_SUM_DEVISION( 2 ,3,4);
cout <<" 2 *3*4 = "<<>
double z = SQUAREROOT_MULTIPLY_SUM_DEVISION ( 100, 2,3,5);
cout << " 100 / ( 2 + 3 +5) "<<>
return 0 ;

}

1/17/09

visual c++ Status bar example

1- Make single document MFC application and deselect printing and printview options
2- In the view menu chose resource and then add New resource and then add ID_TIME_STATUSBAR and accept the defaul value (101) .
3- Add message handler and update message handler in the CMainFrame class for both ID_VIEW_STATUS_BAR .
4- Re
place the previously created indicators array with single ID_SEPARATOR and make sure that the CMainFrame data member m_wndStatusBar is public instead of protected so that it can be accessed from the View class .
5- Replace if (!m_wndStatusBar.Create(this) with this, WS_CHILD | WS_VISIBLE | CBRS_BOTTOM, ID_TIME_STATUSBAR) ;

6- Add the following code to ur CMainFrame.cpp
void CMainFrame::OnViewStatusBar()
{
m_wndStatusBar.ShowWindow((m_wndStatusBar.GetStyle() &
WS_VISIBLE) == 0);
RecalcLayout();

}
void CMainFrame::OnUpdateViewStatusBar(CCmdUI* pCmdUI)
{
pCmdUI->SetCheck((m_wndStatusBar.GetStyle() & WS_VISIBLE) != 0);
}
7- Add the following function OnDraw to your View class pDC->TextOut(30, 30 ,Press the left key to see your computer current time on the status bar ");


8-
Edit OnDraw messege handler as follows

CTime currenttime = GetCurrentTime();
int sec , min , hours ;
hours = currenttime.GetHour();
min = currenttime.GetMinute();
sec = currenttime.GetSecond();
CMainFrame* pFrame = (CMainFrame*) AfxGetApp()->m_pMainWnd;
CStatusBar* pStatus = &pFrame->m_wndStatusBar;
CString strtime ;
strtime.Format( "%d %d %d ", hours,min , sec );
pStatus->SetPaneText(0, strtime );

Finally include #include "MainFrm.h" near the top with other include statements

to download the exe file click here

and the whole project here
this contains sum errors